Friday, July 13, 2012

Manage Firefox via Group Policy

Actually this heading is misleading. There is no proper easy to use  Active Directory Group Policy Object for Firefox yet.  This one shows a  a simple solution that will propogate firefox settings in to client machines via a logon script written in VB Script. Compared to some solutions this one is very simple and can be completed with in a very short time.

When a user logged in , logon scrpt given below will copy a file called user.js to that user's firefox profile folder.  User Firefox profile folder is usually located under :  C:\Documents and Settings\<username>\Application Data\Mozilla\Firefox\Profiles

You can include many default settings in this user.js file such as user home page , proxy settings and switch off or set annoying settings such as checking for default browser etc    ... that you would like to deploy in to multiple machines in the domain. Syntax of the user.js file is exactly similar to the prefs.js file that lives in the firefox profile folder.

Difference between these two files is that settings in the user.js file take precedence over the settings in the  prefs.js file and user.js file can contain subset of preferences stored in the  prefs.js file.
Here's how its done.

1. Create the user.js file with all the necessary settings you would like to be propagated in to client machines. Sample user.js file is shown below.

# Mozilla User Preferences
/* Do not edit this file.
 *
 * If you make changes to this file while the application is running,
 * the changes will be overwritten when the application exits.
 *
 * To make a manual change to preferences, you can visit the URL about:config
 * For more information, see http://www.mozilla.org/unix/customizing.html#prefs
 */
user_pref("browser.startup.homepage", "http://www.mycompany.com");
user_pref("browser.shell.checkDefaultBrowser", false);

2. Create a VB Script file (Ex: MyFile.vbs ) with following code in it  


Option Explicit
dim oShell

dim LastDate
dim filesys
dim profilePath
dim latestProfileFolder
Dim fso
dim fldr
dim MainFolder
dim sourceFile
dim targetFile
dim boolOverWrite

Set oShell = CreateObject("WScript.Shell")

Set fso = CreateObject("Scripting.FileSystemObject")

profilePath = oShell.ExpandEnvironmentStrings("%APPDATA%") & "\Mozilla\Firefox\Profiles"
' If firefox directory doesnt exist , then gracefully exit
If fso.FolderExists(profilePath) Then
Set MainFolder = fso.GetFolder(profilePath)
For Each fldr In MainFolder.SubFolders
    If fldr.DateLastModified > LastDate Or IsNull(LastDate) Then
        latestProfileFolder = fldr.Name
        LastDate = fldr.DateLastModified
    End If
Next

If latestProfileFolder <> "" Then
  profilePath = profilePath & "\" & latestProfileFolder
End If

sourceFile = "\\<Your Server Share>\Firefox\user.js"
targetFile = profilePath & "\user.js"

'WScript.Echo targetFile 
If fso.FileExists(targetFile ) Then
boolOverWrite = vbTrue
fso.CopyFile sourceFile, targetFile, boolOverWrite
Else
boolOverWrite = vbFalse
fso.CopyFile sourceFile, targetFile, boolOverWrite
End If
End If

3. Copy both files in to a shared location that has read access to all domain users.

4. Setup a group policy object so that this vbscript runs during the user logon

Refs:
Prefs.js file - MozillaZine Knowledge Base
Thursday, July 12, 2012

How to find the RSA Server Fingerprint

SSH server's key is the key you see the fingerprint for when you connect to a different server for the first time. This key's identity is used to make sure you are logging in to the SSH you intend to use. 

The keys a SSH server uses to identify itself when you login to it are located in /etc/ssh/ and are named something like ssh_host_rsa_key. 

By default, ssh-keygen will create a key for the current user, which, by default, will be stored in ~/.ssh. The format of a user key and a server key is the same; the difference is where they are placed . When you install the openssh-server package, it automatically generates keys for the server to use.  

To see the fingerprint of the SSH server's RSA key, run the command : sudo ssh-keygen -lf /etc/ssh/ssh_host_rsa_key.

Configuring Aegir Hosting System to use a Remote MySQL server

This post is a quick one on how to configure the Aegir hosting system to host it's database in a seperate MySQL database server. 

With the normal Aegir hosting system instillation , it expects the local MySQL database server to host it's database which contains various aspects of hosted site configuration details. To move this SQL database to a separate MYSQL database server you need to take following steps during/after the Aegir installation.

1. Follow the instructions given in the AegirInstallation Guide

2. Once Aegir has been istalled sucessfully , connect to the local MySQL sever and take a backup of the Aegir database. Also note down the service user account it creates under the database server.

3. Migrate the database to the remote MySQL sever and create the Aegir service user account in it. You should give appropriate rights to this user account so that it can access and manage the Aegir database.

4. Go to the Aegir instalation folder (usually /var/aegir/)and edit following configuration files so that Aegir can connect to the remore MySQL server.


File 1:
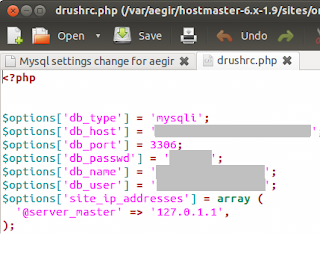
Pah:/var/aegir/hostmaster-6.x-XXX/sites/<Your Site Name>/drushrc.php


$options['db_type'] = 'mysqli';
$options['db_host'] = '<database Server Name>';
$options['db_port'] = 3306;
$options['db_passwd'] = '<Database Password>';
$options['db_name'] = '<Database Name>';
$options['db_user'] = '<Database User Name>';
$options['site_ip_addresses'] = array ();


File 2: /var/aegir/config/server_master/apache/vhost.d/<Your Site Name>
DocumentRoot /var/aegir/hostmaster-6.x-XXX

ServerName  <Your Site Name>
SetEnv db_type  mysqli
SetEnv db_name   <Database Name>
SetEnv db_user   <Database User Name>
SetEnv db_passwd   <Database Password>
SetEnv db_host   <database Server Name>
SetEnv db_port  3306

5. Thats about it. Restart the server and make sure that Aegir is using the remote MySQL server insted of the local one. Then you can uninstall the local MySQL server instance by typing : sudo apt-get --purge remove mysql-server